Let’s do a little bit of old school cake decorating shall we?
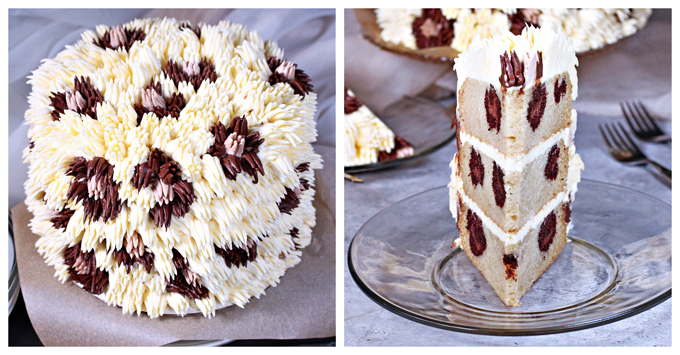
Taking my best recipe for Bakery Yellow Cake once again and adding some Leopard Prints to the batter!
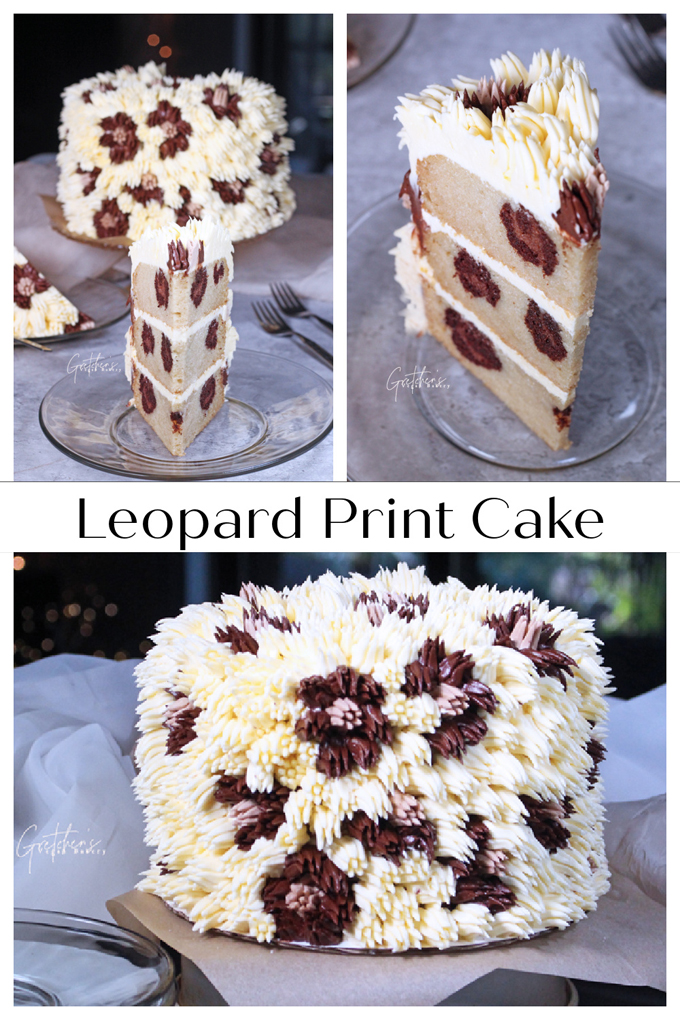
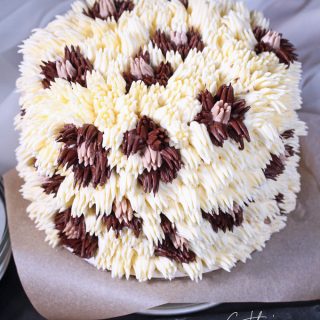
Making a Leopard Print Cake is really easy when you have the right recipes
A thicker cake batter is needed to achieve this really cool look, which is why this yellow cake recipe is perfect!
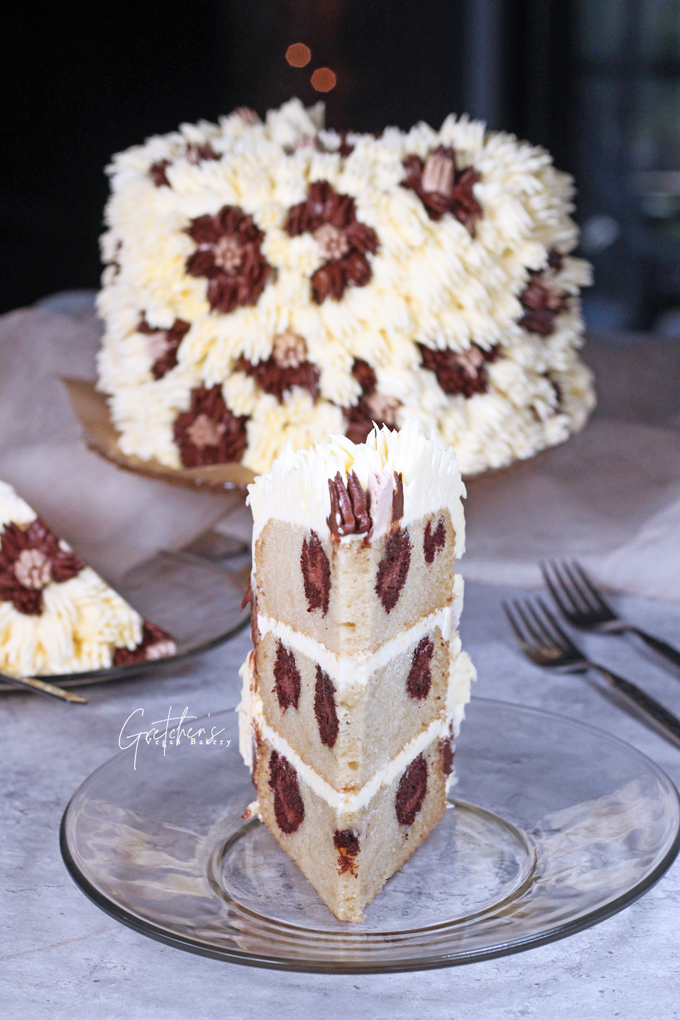
Keeping it really simple with light chocolate buttercream filling in different shades
For the Shag decor with more leopard prints all over!
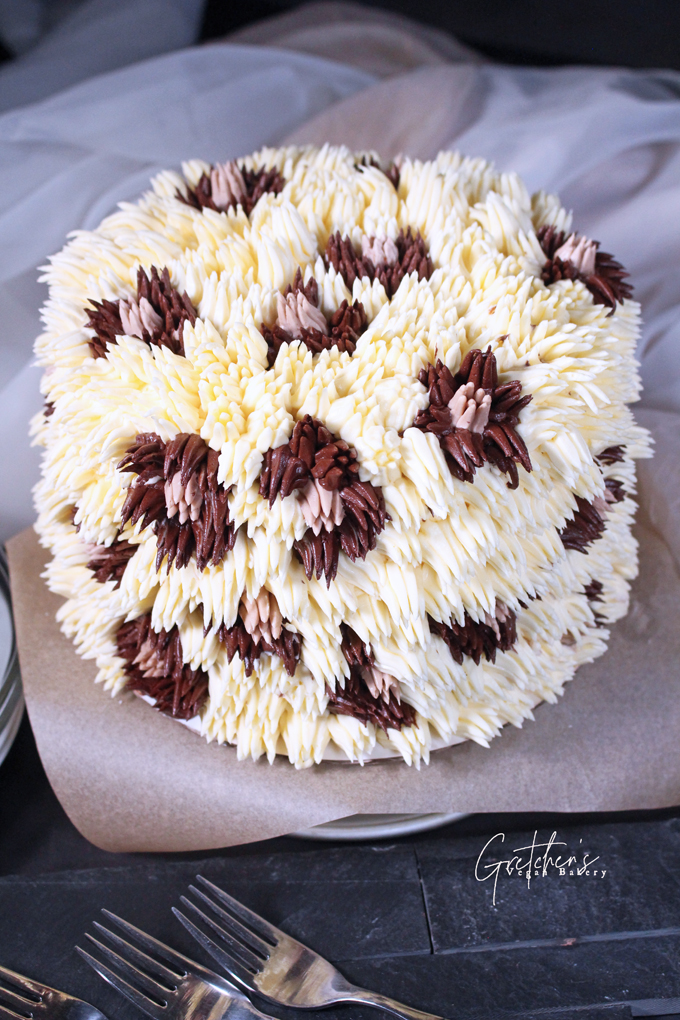
Be sure to watch the YouTube video tutorial for how to make this unique design
Since I can’t really explain it in words, you really need the visual on this one!
This website may contain links as part of the Amazon Affiliate program, which means when you click a link and make a purchase through my website I may earn a small commission at no additional cost to you
Notes for Success:
I’ve used my American Style Buttercream with no added shortening and it was still super stable!
There’s several recipes for buttercream to choose from
But I would recommend the ABC for stability to pipe this shag decor.
If you use another buttercream recipe be sure to add the shortening so the grass tip is pronounced and doesn’t flop
Use 7″ X 2″ cake pans as I always do for my layer cakes, but if you only have 8″ pans I would recommend to only make a 2 layer cake
Also, I often use all oil instead of the combination of melted vegan butter and oil so it is your option which one you like to go with!
Because this is a greater amount of batter in my 7″ pans than I normally use
The bake time is longer~ almost 40 minutes more than usual
Be sure to do the toothpick test to determine done-ness
How to Make a Leopard Print Cake
Ingredients
- Plant Milk 2½cups 600ml
- White Vinegar 2 Tablespoons
- Vegan Butter ¾ cup 170g *see notes above in text article
- Vegetable oil of your choice ¾ cup 188ml
- Granulated Sugar 2¼ cup 450g
- Salt 1 teaspoon
- Vanilla Extract 3 teaspoons 15ml
- All Purpose Flour 4½ cups 560g
- Baking Soda 3 teaspoons 12g
- For the design you will need Cocoa Powder 3 Tablespoons + 4 Tablespoons hot water
for the icing
- 2 X Recipe American Style Buttercream
- For the Chocolate Buttercream shag decor you will again need 3 Tablespoons more cocoa powder + 4 tablespoons hot water to make the paste
Instructions
- Preheat the oven to 350°F
- Grease & parchment line your cake pans
- For the cake batter, first combine the vegetable oil with the melted vegan butter add the vanilla extract and set aside
- Combine the soy milk with the vinegar and let stand for 5 minutes to thicken.
- Sift all the dry ingredients including the sugar together in a large mixing bowl
- Pour the wet ingredients into the dry ingredients in the bowl and whisk smooth, this will be the plant milk mixture and the butter/oil mixture
- Next take out 1¼ cups of the batter and add the cocoa powder mixed with hot water to form a paste
- Once the paste is cool whisk it into the batter to make the chocolate batter
- Now take out an additional ¼ cup of vanilla batter and set that aside in another small bowl~ this will be for the lighter color chocolate batter
- Now with half of the remaining vanilla cake batter & divide it evenly amongst your 3-7" cake pans that are greased and parchment lined
- With the chocolate batter pipe the design as shown in the video tutorial in all 3 pans, you should have more chocolate batter left~ you will use this soon
- Now with the reserved ¼ cup of vanilla batter in your smaller bowl, take about 3 teaspoons of the chocolate batter and mix it in~ this will give you a very light chocolate colored batter
- Now pipe this lighter color batter as shown in the video tutorial
- Now pipe the remaining darker chocolate batter that you still have leftover over the lighter batter as shown in the video
- Now with the remaining vanilla batter gently cover over the designs in each pan with an equal amount of batter until there is no more & the designs are covered completely
- And bake immediately in the preheated 350°F oven for 25 minutes, then turn the oven temperature down to 325°F to bake the rest of the way, approximately 20 minutes more or when you gently press the centers they are springy to the touch. Or do the toothpick test for moist crumbs. *Since the cake recipe is larger than normal these layers will bake slightly longer be careful not to under bake or your centers will be gooey
- Cool in the pan(s) until you can safely touch them without burning yourself then turn the cake(s) out onto a cooling rack to cool the rest of the way.
- Prepare the buttercream recipe according to the instructions on that page and then divide it with approximately 1½ cups for the dark chocolate decor and ½ cup for the light color decor
- Once again make a cocoa paste with the hot water & cocoa powder and then add it *cooled* to the 1½ cups of buttercream
- Next using just about a teaspoon of that darker BC color add it to the small ½ cup bowl of BC to make the lighter color
- Build & Decorate the cake as shown in the video tutorial
Video
Hi I wanted to know if I can use 2 cups of vegetable oil instead rather that 1 cup vegan butter and 1 cup vegetable oil?
Hi! I am so happy you asked this question because it alerted me to the mistake I have in the recipe ingredients! It is ¾ cup of each! Not 1 cup of each!
So please note that change and YES to all oil for a total of 1½ cups not 2~ Thank you!!